Friday, May 20, 2011

Food For Friday: Artisan Bread in 5 Minutes a Day

I had read about this book, Artisan Bread in Five Minutes a Day, all over blogland.  We love artisan bread, so I loved the idea of making a batch of dough that would last up to 2 weeks in my fridge and could be used to make baguettes, ciabatta, or even pizza.  I borrowed the book from the library, purchased an oven thermometer and bin for the dough, and got busy experimenting.  I haven't made many of the recipes in the book, but I've had a lot of success with The Master Recipe dough.
Baguette
We've used the fresh baguettes as a side for pasta and to make meatball sandwiches,
Meatball Sandwich
and the pizza dough is delicious!
BBQ Pizza
I would recommend getting the book if you want to try out a lot of the recipes, but I thought I would share The Master Recipe with you, so you can see just how easy it is.  (This recipe makes 4 one lb. loaves or pizza crusts, but it can easily be doubled or halved.)

Ingredients:
3 cups lukewarm water
1 1/2 tablespoons granulated yeast (I use Fleichman's bread machine yeast in the glass jar with a yellow label)
1 1/2 tablespoons kosher salt
6 1/2 cups unsifted, unbleached, all purpose white flour (scoop the cup to fill, then gently use the back of a knife to "sweep" off the excess; do not pack the flour!)

Directions:
Warm the water slightly until it feels just a little warmer than body temperature.  I usually microwave mine. 
If you have a stand mixer, attach your dough hook and put the water into the mixing bowl.  You can also mix the dough by hand right in the plastic container.  (You need a 5 quart resealable, lidded, but not airtight plastic food container.)  I like to use my mixer because it can get hard stirring in all the flour.
Add the yeast and salt into the warm water.  Mix in, but don't worry if it doesn't all dissolve.  Put your bowl onto your mixer if you are using a mixer.
Mix in the flour.  Kneading is unnecessary.  Add all of the flour at once and mix with a wooden spoon in your plastic container, or mix with a stand mixer on medium using the dough hook.  The dough is finished when it is uniformly moist without dry patches.  The dough will be wet and loose enough that it forms to the shape of its container.  If you used a mixer, dump the dough into your plastic container.
Cover with the lid (again, make sure it's not airtight!) and allow the dough to rise on the counter at room temperature for at least 2 hours, up to 5 hours.  Put the dough in the refrigerator to store.  The dough will be easier to work with if you refrigerate it overnight before use, which makes it much less sticky.

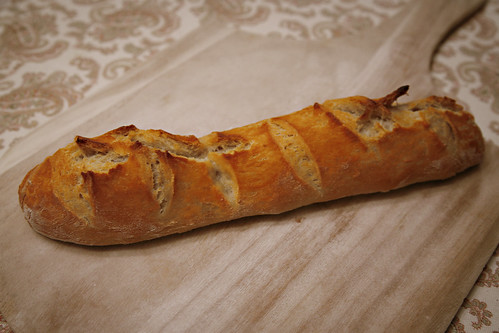
This master dough can be used for a variety of recipes, including baguettes, ciabatta bread & pizza dough. 
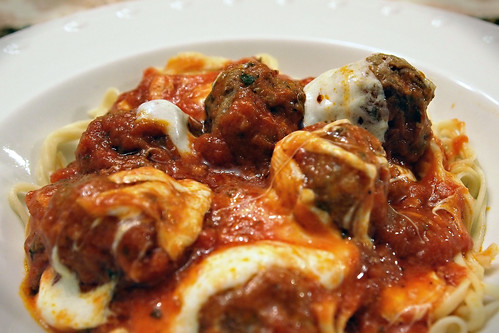
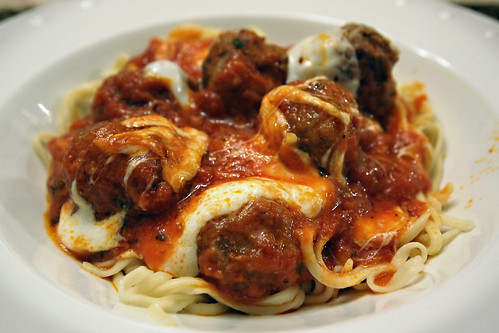
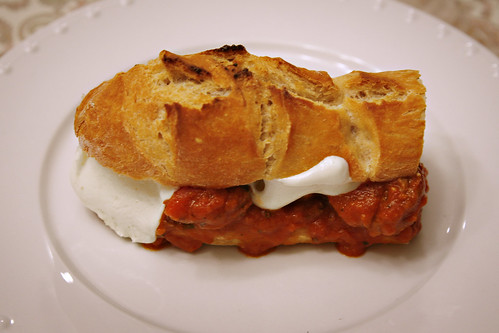
Meatball Sandwiches
For the meatball sandwiches, I prepared fresh baguettes, then cut them in half.  I spread roasted garlic spaghetti sauce on one half, and laid slices of fresh mozzarella on the other half.  Bake in the oven at 350 degrees until the sauce is hot and the cheese is melted.  Place homemade meatballs along the bottom half of the baguette.   If you have some fresh basil on hand, chop it into thin ribbons and lay some on top of your meatballs.  Put the top piece of baguette on top to make your sandwich.
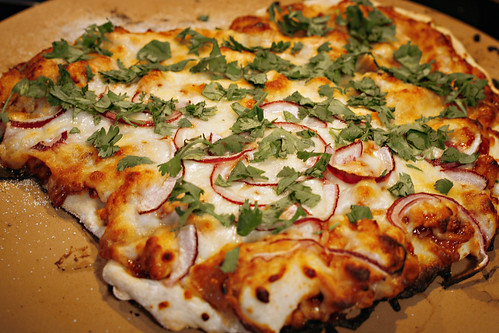
BBQ Chicken Pizza
We've used the pizza dough to make several different varieties of pizza, but one of our favorites (that is pictured above) is BBQ Chicken Pizza.  Spread the prepared crust (before baking) with BBQ sauce.  I like to use Sweet Baby Ray's.  Top with chopped or shredded cooked chicken breast.  Add slices of fresh mozzarella cheese & thinly sliced red onion.  Bake as directed in Artisan Bread in 5 Minutes a Day.  When you remove the pizza from the oven, sprinkle chopped cilantro over the top before serving.

You can find a lot of recipes on their website, in addition to the recipes in the book.  They have come out with another book, Healthy Bread in 5 Minutes a Day, that features a lot of whole grain recipes.  I recently purchased the ingredients for some of those recipes and look forward to trying them out as well!  Happy Bread Baking!

Sunday, May 1, 2011

Gender Reveal Party! It's a....

This past Thursday, we hosted a little party with some of our close friends to find out if Lilo is a boy or a girl!  It was a lot of fun and we are so glad we found out in a fun way with friends & family, rather than at the ultrasound appointment.  We had to hold onto the secret for 2 1/2 days between our ultrasound and the party, but it was worth it!

Holding the card I made for the ultrasound tech to write Lilo's gender in, before we went into our ultrasound appointment:
MeCardRose
After the appointment, we took the card to Babies R Us.  We picked out two outfits, a boy and a girl choice, and took them both to customer service.  They opened the card out of sight and wrapped up the right outfit for us to open at our gender reveal party!
UsBabiesRUs
I love planning parties, so it was a lot of fun for me to create a festive atmosphere for our party.  Everything went with our blue & pink, boy or girl theme.
DiningRoom
Banner1
table
I thought bite size babycakes were appropriate for the occasion!
Babycakes
CupcakePennant
We incorporated the Chinese characters for "boy" and "girl" into our table decor.
BoyChinese
GirlChinese
The package holding our big surprise!
Package
Our families skyped in from Ohio & Texas to join in the celebration and share our big news with us!
skype
All of our friends wore pink or blue to vote for their guess of whether Lilo was a boy or a girl.
Group
After waiting for 2 days, we were dying to know and so excited to rip into that package!
UsParty
This photo is blurry because we were moving, but the looks of surprise are classic...
Surprise
It's a....
IsACard2
CardBoy
BOY!!!!
Surprise2
We are going to have a son!
UsOutfit
For some reason, after thinking it was a boy our whole pregnancy, after our ultrasound, Tru really thought it was going to be a girl.  He was shocked and thrilled that it was a boy!  I love this photo of him showing off his son's outfit to our families over skype:
TruOutfit
We announced our news to friends and family through e-mail and Facebook with this photo.  Bring on the blue!
BoyBannerSteps
After months of waiting, it is still a little bit surreal that we know we are having a boy!  We are so excited to meet our son! 

Friday, April 29, 2011

Food For Friday: Homemade Meatballs

We combined elements from several different recipes to create our favorite meatball recipe.  We love to eat meatballs with fresh pasta and we also really like to make meatball sandwiches with fresh baguette bread.  My next Food for Friday post will be a bread dough recipe we have become big fans of and use to make meatball sandwiches.  Please, please use fresh mozzarella cheese and grated parmesan (that you grate yourself or purchase already grated in a bag in the shredded cheese section).  Do not use that powdery white stuff that they sell as parmesan cheese!  The fresh cheese makes such a huge difference and takes the meatballs to a much fresher, tastier level!
meatballspasta
Ingredients:
1.5 lbs lean ground beef (we use 94% lean organic)
1/4 cup shredded parmesan cheese
1 egg
1/2 cut Italian breadcrumbs (we use fresh ones that I make in the food processor with some Italian seasoning)
4 cloves minced or pressed garlic
1 tsp. dried oregano
1/2 cup fresh chopped Italian parsley
1 heaping tsp. kosher salt
fresh ground pepper (a few turns of the grinder)
olive oil
1 jar of roasted garlic pasta sauce (I use Classico)
fresh mozzarella cheese (I usually use the "log" of fresh mozzarella from Costco that comes in a 2 pack)
pasta (we like fresh linguine)

Put all of the ingredients from the lean ground beef down to the fresh ground pepper into a metal or glass bowl and mix well.  Form into 1.5 inch balls.  (We use a metal cookie dough scoop sometimes to speed up the process and make them more uniform.)  Heat about a tablespoon of olive oil in a deep saute pan over medium heat.  Add the meatballs and turn them several times to brown the exterior of the meatballs.  (Don't worry about cooking them through at this point.  You are just browning the outside to add a "crust.")  Pour in the jar of pasta sauce, cover with a lid & simmer on medium to medium low until the meatballs are cooked through, usually 30 to 45 minutes.
meatballspasta2
Slice the mozzarella cheese and lay over the top of the meatballs and sauce.  Cover for a minute or two until the cheese is good and melted.  Serve over pasta.  Our favorite is to serve it over fresh linguine.  If you don't want to make fresh pasta at home, Buitoni fresh pasta in the refrigerated aisle is a great option.  If you happen to have fresh basil growing in an herb garden this summer, some thin ribbons of basil sprinkled on top is a delicious addition too!

Tuesday, April 26, 2011

Happy Birthday to Me!

Earlier this month we celebrated my birthday.  I was actually at a Campus Crusade for Christ staff women's conference in the mountains on my birthday, which made it unusual to start with.  It quickly became even more unusual when I woke up at 4 am the morning of my birthday with severe chest & arm pain that lasted for 3 hours.  After a call to my OBGYN, they wanted me to come in just to check and make sure everything was ok, so I left the conference early to head to the doctor.  The baby sounded great, and other than my blood pressure being high, nothing was concerning, so we went home to rest for the evening.  (I've since had an appointment with a cardiologist and everything looks fine with my heart, which was great news!)  I think my surprise gift was getting to hear Lilo's heartbeat on my birthday!

Because I was supposed to be at the conference, we had planned to celebrate my birthday with a fun dinner date that weekend, so a couple of days later, I got to head downtown with my handsome hubby to enjoy a fun evening out and a delicious dinner!  Because we haven't been able to get out much during my pregnancy, it was an extra fun date night! 
mebirthdayflowers
With beautiful flowers from my hubby before we left for dinner

MeCard
Opening his sweet card at dinner (which is one of my favorite parts of celebrating any special occasion!)

UsDinner
My handsome date

My birthday dessert as big as my head (peanut butter and chocolate cookie!)

Right before I left for the conference, I got an early birthday package from my mom and it was the BEST surprise!  Hydrangea are one of my most favorite flowers, and she sent me two hydrangea plants for our yard.  Nearly all of our landscaping beds were completely filled with rocks when we purchased our home, so I am slowly trying to add beautiful flowering plants and I can't wait to cut my first hydrangea blooms to bring into the house. 

It is wonderful, but also crazy, to think that next year I will be celebrating as a mom!

Friday, April 8, 2011

Food For Friday: Spinach, Chicken & Cream Cheese Lasagna

When I think of lasagna, I usually think of a time-consuming, labor intensive process.  I was surprised by how quick and easy this lasagna was to assemble.  It had a great flavor & smooth texture, and I like that the spinach adds nutrients too!  I adapted this recipe from Faithful Provisions with a few changes and additions.  It will definitely be added to our regular list of recipes and I think it will freeze well too.
SCC Lasagna Slice
Ingredients:
6 lasagna noodles
1 jar roasted garlic pasta sauce
4 oz. cream cheese (I use lower fat neufatschel cheese)
1 cup chicken broth or stock
2 cooked chicken breasts, shredded
1 cup packed fresh baby spinach
2 1/2 cups shredded mozzarella cheese

Put a pot of salted water on to boil for the lasagna noodles.  Cook noodles until tender (following the instructions on the box.)  Drain.

Preheat oven to 425 degrees.

While the noodles are cooking, shred your 2 cooked chicken breasts.  (If I am making several recipes in a week that call for cubed or shredded cooked chicken, I like to cook a whole pan of chicken at the beginning of the week and put the cooked whole breasts in a container in the fridge.  This saves me time later in the week, and cold chicken is easy to shred with your fingers!)

Heat one cup of chicken broth or stock over medium heat.  Add the cream cheese and mix until the cream cheese is melted.  Using a spoon or a whisk, get out most of the lumps.  The sauce will seem very liquidy at this point.  Reduce heat to low and simmer, stirring often, until the sauce thickens.  Remove from the heat.

Use an 8x8 or 9x9 glass baking dish & spread enough pasta sauce in the bottom of the pan to make a thick layer to coat the bottom of the dish (so your noodles will not stick.)  Lay one layer of cooked lasagna noodles in the dish.  (I used kitchen shears to cut my noodles to fit.)  Make sure you have a layer of noodles that totally covers the bottom of your dish.  Spread 1/2 of the cream cheese sauce over the layer of noodles.  Top with a layer of spinach and spoon pasta sauce over the spinach to cover well, using about 1/2 the jar.  Sprinkle 1/2 of the shredded chicken on top & sprinkle with a layer of mozzarella cheese (about 1 cup).  Add a 2nd layer of noodles and repeat the layering, ending with mozzarella cheese on top.  Use the rest of the mozzarella to cover the top well.

Cover with foil and bake 20-25 minutes.  Reduce heat to 400 degrees, uncover, and bake an additional 10-15 minutes or until the cheese is slightly browned and bubbling around the edges.  Remove from oven.

Let sit for about 10 minutes to allow the lasagna to firm up before slicing.
SCC Lasagna Dish
This would be a perfect recipe to double and make two of simultaneously....one to eat and one to freeze or drop off to a friend.  You could also double the ingredients and use a 13x9 dish if you have a larger family or are entertaining.

Thursday, April 7, 2011

Mystery Dinner Date

Dinner Detective Logo
Yes, it is April, and yes, I am writing about Valentine's Day!  I was beginning to show and thought it was noticeable enough in some of our photos that I didn't want to post about our Valentine's date until after we shared our pregnancy news.  I am finally getting around to sharing our night out with you!  We had a gift certificate to the Dinner Detectives Murder Mystery Dinner Show and we thought Valentine's Day would be a perfect time to enjoy it!

When we received our table assignment, we smiled at the table number we were assigned to:
Table 13
Us Dinner
I've wanted to go to a murder mystery dinner theater ever since I was in high school, but I've just never actually made it happen, so I was really looking forward to it.  Truman really likes figuring out clues and putting pieces of a puzzle together, so it was right up his alley too. 
Throughout the evening, scenes unfolded in the dining room and clues were collected and passed to the tables for review.
Action2
All of the clues were gathered on a "clue table" for further review as the guests worked to solve the mystery.
Clue Table
My handsome hubby worked hard to figure out whodunnit and he successfully solved the mystery!  I, on the other hand, had no idea who the murderer was until he explained his theory to me.  Figuring out mysteries, or movie plots for that matter, is not my forte!  But I enjoy myself trying.
Tru Studying Clue
We had a great time and it was a fun and unusual way to spend a night out together! 
Us Detectives
Us Murder Outline

Friday, March 18, 2011

A New Addition!

My blogging has been on the back burner for the past 3 months because I've been busy working on an even sweeter project, the best addition we've ever made to our home....

We are expanding our family by two feet!  Meet Baby Lo!

10 Week Ultrasound Photo

Lilo, our nickname for "Little Lo," will be here in mid-September.  We are praising God for the blessing of this sweet life!

You may remember me sharing in past posts that 13 is a special number for our family.  Truman was born on December 13.  I was born on April 13.  We were married on May 13.  And Lilo is due on September 13!  We'll see if baby Lo carries on the tradition!

7 weeks ultrasound 2
Our 1st ultrasound at 7 weeks

I have had a rough first trimester, so my days have been filled with hour upon hour of resting on the couch, naps, Sprite, and watching every show on On Demand and our DVR.  My amazing husband has been busy doing all of our grocery shopping, preparing dinner, doing laundry, and cleaning, while I watch from the couch.  But, we are so incredibly thankful for this little life and know that this season of sickness is a small price to pay for a lifetime as parents!

13 weeks belly 1
Our 1st belly shoot at 13 weeks
13 weeks belly 2
Lilo was the size of a peach at 13 weeks
13 weeks belly 3
I am 14.5 weeks pregnant and hoping that the 2nd trimester will bring less time on the couch and more time in my craft room!  I have a whole stack of fabric waiting to be turned into baby gifts for friends who have welcomed new additions to their families, and ideas for a baby scrapbook for Lilo swimming around in my head.  I will continue to share pregnancy news and photos of my growing belly, but I hope to be sharing new craft projects soon too!  And of course, I'm sure there will be some nursery photos in the coming months as we prepare for Lilo's arrival!