
 For awhile now, I've been keeping my eyes out for something to hang on either side of the window in our breakfast nook. I recently found this fork and spoon at Hobby Lobby and snagged them on sale for just dollars a piece. I had seen a similar idea in the Pottery Barn catalog that caught my eye, but was definitely not in the budget, so I was excited to find these pieces for a fraction of the price! I think they have fun character and add a little bit of whimsy to our space. I also like that they are versatile pieces. If I ever want to move them to a different spot, they can be hung side by side or split up as they are now. I love finding a look I like for less!
Tuesday, March 31, 2009
Fork & Spoon
For awhile now, I've been keeping my eyes out for something to hang on either side of the window in our breakfast nook. I recently found this fork and spoon at Hobby Lobby and snagged them on sale for just dollars a piece. I had seen a similar idea in the Pottery Barn catalog that caught my eye, but was definitely not in the budget, so I was excited to find these pieces for a fraction of the price! I think they have fun character and add a little bit of whimsy to our space. I also like that they are versatile pieces. If I ever want to move them to a different spot, they can be hung side by side or split up as they are now. I love finding a look I like for less!
Monday, March 23, 2009
Shabby Organizing
Since my hubby and I work in full-time ministry and don't have an office, we work out of our home. My craft table and desk are 2 in 1 and I always struggle with paperwork being strewn across my craft table even though I rarely sit at my desk to work on administrative tasks. (I usually curl up on the couch or in a comfy chair with my laptop.)
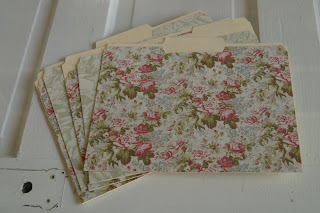 I desperately needed some file folders to corral the often used paperwork that I needed to keep at my fingertips and the incoming-outgoing and important paperwork, to keep my workspace free from paper clutter. But, I also didn't want my beautiful creative space to be invaded by cubicle looking industrial office supplies.
I've seen pretty patterned file folders like these, or these, or these, but we already have a whole box of plain manilla file folders and I wanted to be as thrifty as possible! I found the perfect scrapbook paper on sale at Michael's and used some that I already had in my stash and made my own shabby file folders.
I simply traced around the file folder on my 12x12 paper, cut it out, and used this adhesive to attach the scrapbook paper to the file folder. Now I have organized spots for my paperwork that fit right in and make me a little happy every time I see them!
 I desperately needed some file folders to corral the often used paperwork that I needed to keep at my fingertips and the incoming-outgoing and important paperwork, to keep my workspace free from paper clutter. But, I also didn't want my beautiful creative space to be invaded by cubicle looking industrial office supplies.
 I've seen pretty patterned file folders like these, or these, or these, but we already have a whole box of plain manilla file folders and I wanted to be as thrifty as possible! I found the perfect scrapbook paper on sale at Michael's and used some that I already had in my stash and made my own shabby file folders.
I simply traced around the file folder on my 12x12 paper, cut it out, and used this adhesive to attach the scrapbook paper to the file folder. Now I have organized spots for my paperwork that fit right in and make me a little happy every time I see them!
Saturday, March 21, 2009
Shabby Hooks
If you know me, you know that I love love receiving fun mail, as in handwritten snail mail delivered by the USPS. Every day I anticipate the mail truck's delivery and look forward to seeing what is in our mailbox. All too often it is just junk mail or bills. I look forward to coupons, ads & free samples, but nothing gets me excited like a hand addressed letter or a package from a friend!
 Last week, I opened our mailbox to find a very fun for-no-reason-other-than-I-love-you (which is the BEST reason!) package from my mom and inside were these cute hooks that match our guest room! I was tickled because they so perfectly match the colors and decor in that room and I just knew they would look wonderful on the wall. They provide a great spot for guests to hang their towels or a jacket.
I thought that scrapbook paper inserted into the opening instead of photos would be a shabby touch and I had the perfect scrapbook paper already on hand! I cut the paper to size and hung the hooks on the wall this week and I think they turned out so cute! Thanks Mom! Love you!
Thursday, March 19, 2009
Food for Friday: Tequila Lime Chicken
 This recipe for Tequila Lime Chicken has quickly become one of our grilling favorites! The marinade adds so much flavor and keeps the chicken extremely juicy & tender. We've shared it with friends on many occasions and they almost always ask for the recipe.
Ingredients:
2 lbs. chicken breast tenders (or breast, sliced to tender size)
1/4 c. tequila
1/3 c. lime
1/4 c. olive oil
1/2 c. fresh cilantro
3 large cloves garlic
1/2 jalapeno pepper
1/4 c. sweet onion
1/2 tsp black pepper
1/4 tsp salt
1/4 tsp coriander seed
1/4 tsp cumin
Directions:
In the bowl of food processor, (I use a mini processor) add all ingredients except chicken. (There is no need to chop the ingredients. Just throw them in and let the processor do the work for you! I do chop the onion into large chunks to help me measure out 1/4 of a cup.)
 Process until blended well, about 2 minutes.
In large shallow bowl, add chicken and marinade ensuring all chicken is submerged.
 Cover with plastic wrap and refrigerate for 30 minutes (no more than an hour or the lime will start to "cook" the chicken!)
Fire up grill to medium heat, and using tongs, remove chicken from marinade and place on grill.
Grill on medium/medium low, flipping once, until just cooked through, about 15 minutes.
Plate and let rest for about 5 minutes before serving.
 We serve the Tequila Lime Chicken with a cilantro lime rice, shredded lettuce, diced tomato, black beans, shredded Mexican cheese, guacamole and sour cream. Make a bed of rice, top with a sliced chicken breast and add your toppings as you like!
Enjoy!
To make cilantro lime rice, steam jasmine rice in a rice steamer. After it is cooked and fluffy, stir in the juice of one lime and chopped fresh cilantro with a pinch of salt. (For approximately 2 1/2 cups of dry rice, I use the juice of one lime and 2-3 tablespoons of chopped cilantro.) Add the lime juice & cilantro to your taste!
Sunday, March 15, 2009
Divine Romance
Have you heard of Phil Wickham? His album, Singalong, has become one of my favorites for worship music this year. I particularly adore the song Divine Romance.
What I truly love is that Phil Wickham is offering his album for free to be downloaded from his website! He only asks that you sign up for his e-mail newsletter and then the mp3 file of Singalong will be sent to you.
(I received the download for the free album about 6 months ago, and I can assure you that you will not receive a bunch of junk mail as a result of signing up for the newsletter. I think that I have received 1 e-mail from Phil Wickham since I registered to receive the album, so if you are concerned about receiving a slew of e-mails from his site, know that you will not be bombarded with e-mails from the Phil Wickham site!)
http://philwickham.com/
I thought I would take this Sunday to let you in on some praise music I've been worshiping with. I have really enjoyed this album and I wanted to share it with you in case you hadn't heard of it! And, best of all, it's free to check it out!
Friday, March 13, 2009
Sewing Love
I know that Christmas past has slipped from the day to day thoughts of most of us, especially as we watch longingly for all signs of spring's arrival from warmer, sunny days to flowering branches. But, I realized that I never shared one of my favorite gifts from this past Christmas with you! My new (now new-ish) sewing machine!
 Just two years ago, I really had no hankering to sew whatsoever. But, after we moved into our new home, I really wanted to sew curtains. So, I borrowed a sewing machine. And then, as I clicked around blogland, I saw one cute fabric project after another that inspired my desire to sew. Knowing that the curtains weren't all that difficult, as I saw these fabulous project ideas, I thought (with a little trepidation in my heart), "I could do that, too, right?"
And so, a sewing machine found a spot on my Christmas wishlist, and I began bookmarking sewing projects that I wanted to try. A fabulous early Christmas gift from my mom, my sewing machine was delivered a few weeks before Christmas. And I decided that I wanted to try and make a few gifts with my shiny new toy. I knew my mom would love this fabric, so the very first project I tried with my machine was this purse.
 I was really happy with how it turned out, and the most challenging part for me was following a pattern for the first time! I shared here about another easy sewing project I tackled a couple of months ago. Next on my list are these. I have the fabric stacked neatly in my craft room, ready to go!
If you haven't ever sewed, or are like I was and haven't sewed since junior high home ec class, I want to encourage you that it really isn't as hard as it looks! I think it can seem intimidating, and it's tempting to think, "I could never sew that!" But, it's not as hard as it looks and if you just take the first step to give it a try, you never know how much you might enjoy it! If you do sew and have a fun project that is a favorite, or one on your to-try list, share the link with me! I'd love to check them out.
Sunday, March 8, 2009
Pretty Plates
 For over a year, I've been collecting plates that coordinate with the colors in our guest room, which is also my craft room. I didn't want to hang them until I had enough for a grouping, and over the holiday season I found a couple more to finish out the arrangement! Some of the plates are antique china, some are new with vintage charm. With Tru's help, I finally hung them at the end of last week. I tried out several arrangements on the floor before deciding on this one, and I am really happy with how they turned out. They add another layer of coziness to the room!
 I would love to show you how they fit into the decor of the room, but I cannot reveal photos of this room yet! When we taped our episode of Home Made Simple for TLC, this room was the focus of our efforts, so there are several projects that must remain a secret until our show airs in April! If I widened the angle of this photo at all, you would have a sneak peak of things that cannot yet be seen. But, let me assure you that as soon as our episode airs next month, I have a bunch of pictures from this room that I can't wait to show you the details of!
Wednesday, March 4, 2009
Lampshade Makeover
We moved into our home almost a year and a half ago. We didn't have bedroom furniture when we got married, so we used some boxes stacked next to the bed as a makeshift nightstand for months, with a lamp that I had from my single days. Since then, we've gotten beautiful new bedroom furniture and we've unpacked the bedding we love from our wedding registry, I sewed curtains for our windows, and we've added a few accessories.
 We enjoy reading in bed at night, but my wonderful hubby hasn't had a lamp on his side of the bed for over a year! We found inexpensive lamps in a style we liked from Walmart and I found the perfect damask fabric to coordinate with our bedding for the lampshades. And then, all of the supplies sat in our closet for months, the project on my to-do list, but I just couldn't find the time to tackle it. Truman has asked me sweetly on many occasions if I could please cover the lampshades so that he could use his lamp without lighting our room up like a spotlight. A few weeks ago, I finally took an evening and set-to work to cover our lampshades. He deserved it!
I thought I would share a tutorial of the project because it really is easy and you can add so much character to an inexpensive lampshade for a custom look!
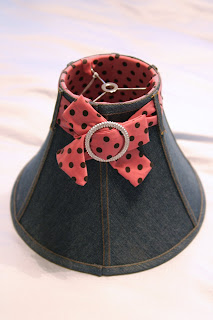
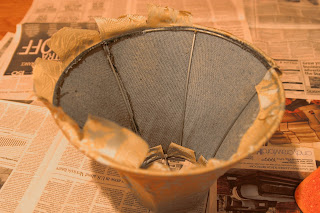
I started off with these crazy lampshades that I got on clearance at Hobby Lobby for under $3.00 a piece! The pink and black polka dots and rhinestone clasp just didn't coordinate well with our light blue and chocolate brown decor. But, the size and shape worked great with our lamp and they were a steal at that price. (I apologize for the lousy quality of the pictures! I was working on this project at night and we just don't have great indoor lighting for photographs.)
 Most store bought lampshades use hot glue to hold them together. First, I pulled off the embellishments from the bow to the "boning" pieces on the edges.
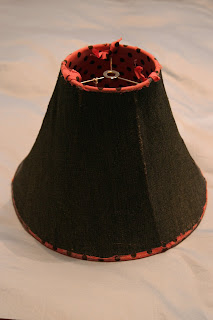 Next, I very carefully removed the inner hot pink and black polka dot lining. I had to be extra careful not to pull the outer jean fabric off of the frame as I removed the polka dot lining. I needed the outer fabric shape to stretch my fabric over.
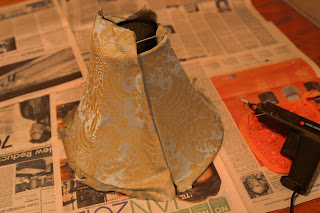
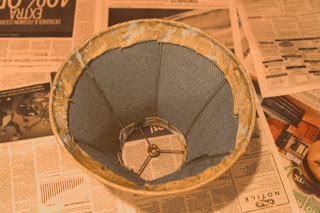
 I ironed my fabric smooth and layed it out. I cut a straight line up the pink polka dot lining so that it would lay flat and I used it as a pattern to cut my fabric for the exterior of the lampshade.
 Because the inside lining is a tiny bit smaller than the outside of the lampshade, and I needed some extra fabric on the edges to tuck around the top and bottom of the lampshade, I cut around the pattern piece leaving a good 2-2.5 inches on all sides.
 I used the first piece that I cut from my damask fabric as a pattern to cut a second piece, since I was covering two lampshades.
 You'll need spray adhesive (I used Elmers multipurpose) and a hot glue gun for the next steps. I like the Elmers spray adhesive because it is repositionable for several minutes after it is tacky and ready to adhere, but dries to a more permanent hold.
 Wrap the fabric on the lampshade and get a good idea of how you need to line it up to cover it with ample overlap fabric on the top and bottom to wrap over the edges. You are then going to remove the fabric and spray the lampshade evenly, covering it well, with the spray adhesive. Follow the directions on your spray adhesive, but you generally need to allow it a minute or two to become fully tacky before adding your fabric. I would highly recommend doing the adhesive spray step outside!!! It's hard not to have overspray and the sticky finish can be a pain to remove from things you don't want it on!
After the lampshade is tacky, wrap your fabric back on it as you figured out in your trial. (This is where the Elmers is helpful because if you don't get it in the right spot on your first try, you have a few minutes to reposition it!) Fold the unfinished edge under and use a thin line of hot glue to hold it in place.
 Start with the top, wrapping the extra fabric over the edge and hot gluing it to the inside of the lampshade. You will need to cut slits into the fabric every 2-3 inches around the top, being careful not to cut all the way to the edge of the lampshade, so your cuts are not visible from the outside. This will help the fabric fold over and lay smoothly without wrinkles or bunching along the edge. You'll need to make a slit where each of the metal frame pieces are to wrap around them. (Click on the photo to enlarge for a more detailed view.) I folded the raw edge under as I folded each of the fabric flaps and attached them with hot glue.
 Repeat this same process along the bottom edge. You really don't have to worry about each of the flaps lining up perfectly since it is on the inside and you won't be able to see it!
 After you finish gluing down the bottom flaps, your finished! Attach the shade to your lamp and you have a whole new custom look! Here is one of my finished lampshades in our bedroom:
 Such an improvement! It really adds a more finished look to our nightstands and we are both enjoying our reading lamps at night! The total cost for this lampshade project was under $15 for two lampshades. And, I love that I was able to choose my own fabric over picking from pre-made lampshade styles for less than I could have purchased 2 new lampshades in a store.
 We enjoy reading in bed at night, but my wonderful hubby hasn't had a lamp on his side of the bed for over a year! We found inexpensive lamps in a style we liked from Walmart and I found the perfect damask fabric to coordinate with our bedding for the lampshades. And then, all of the supplies sat in our closet for months, the project on my to-do list, but I just couldn't find the time to tackle it. Truman has asked me sweetly on many occasions if I could please cover the lampshades so that he could use his lamp without lighting our room up like a spotlight. A few weeks ago, I finally took an evening and set-to work to cover our lampshades. He deserved it!
I thought I would share a tutorial of the project because it really is easy and you can add so much character to an inexpensive lampshade for a custom look!
I started off with these crazy lampshades that I got on clearance at Hobby Lobby for under $3.00 a piece! The pink and black polka dots and rhinestone clasp just didn't coordinate well with our light blue and chocolate brown decor. But, the size and shape worked great with our lamp and they were a steal at that price. (I apologize for the lousy quality of the pictures! I was working on this project at night and we just don't have great indoor lighting for photographs.)
 Most store bought lampshades use hot glue to hold them together. First, I pulled off the embellishments from the bow to the "boning" pieces on the edges.
 Next, I very carefully removed the inner hot pink and black polka dot lining. I had to be extra careful not to pull the outer jean fabric off of the frame as I removed the polka dot lining. I needed the outer fabric shape to stretch my fabric over.
 I ironed my fabric smooth and layed it out. I cut a straight line up the pink polka dot lining so that it would lay flat and I used it as a pattern to cut my fabric for the exterior of the lampshade.
 Because the inside lining is a tiny bit smaller than the outside of the lampshade, and I needed some extra fabric on the edges to tuck around the top and bottom of the lampshade, I cut around the pattern piece leaving a good 2-2.5 inches on all sides.
 I used the first piece that I cut from my damask fabric as a pattern to cut a second piece, since I was covering two lampshades.
 You'll need spray adhesive (I used Elmers multipurpose) and a hot glue gun for the next steps. I like the Elmers spray adhesive because it is repositionable for several minutes after it is tacky and ready to adhere, but dries to a more permanent hold.
 Wrap the fabric on the lampshade and get a good idea of how you need to line it up to cover it with ample overlap fabric on the top and bottom to wrap over the edges. You are then going to remove the fabric and spray the lampshade evenly, covering it well, with the spray adhesive. Follow the directions on your spray adhesive, but you generally need to allow it a minute or two to become fully tacky before adding your fabric. I would highly recommend doing the adhesive spray step outside!!! It's hard not to have overspray and the sticky finish can be a pain to remove from things you don't want it on!
After the lampshade is tacky, wrap your fabric back on it as you figured out in your trial. (This is where the Elmers is helpful because if you don't get it in the right spot on your first try, you have a few minutes to reposition it!) Fold the unfinished edge under and use a thin line of hot glue to hold it in place.
 Start with the top, wrapping the extra fabric over the edge and hot gluing it to the inside of the lampshade. You will need to cut slits into the fabric every 2-3 inches around the top, being careful not to cut all the way to the edge of the lampshade, so your cuts are not visible from the outside. This will help the fabric fold over and lay smoothly without wrinkles or bunching along the edge. You'll need to make a slit where each of the metal frame pieces are to wrap around them. (Click on the photo to enlarge for a more detailed view.) I folded the raw edge under as I folded each of the fabric flaps and attached them with hot glue.
 Repeat this same process along the bottom edge. You really don't have to worry about each of the flaps lining up perfectly since it is on the inside and you won't be able to see it!
 After you finish gluing down the bottom flaps, your finished! Attach the shade to your lamp and you have a whole new custom look! Here is one of my finished lampshades in our bedroom:
 Such an improvement! It really adds a more finished look to our nightstands and we are both enjoying our reading lamps at night! The total cost for this lampshade project was under $15 for two lampshades. And, I love that I was able to choose my own fabric over picking from pre-made lampshade styles for less than I could have purchased 2 new lampshades in a store.
Subscribe to:
Posts (Atom)


